Tagging Screens
Tag screens automatically or manually to unlock heatmaps and journey analytics in iOS
Good screen names turn raw replays into actionable heat‑maps, screen analytics, conversion funnels and journey charts. This guide walks you through reviewing the automatic tags first, deciding when (and how) to add manual tags, and finally verifying that every screen shows up with a meaningful duration.
Automatic Screen Tagging — the recommended approach
The UXCam iOS SDK automatically tags most screens (i.e., UIViewControllers or top‑level SwiftUI scenes). You can override or extend this behaviour where needed.
For iOS, UXCam automatically tags view controllers the moment they appear. This is the default and recommended workflow because it captures user journeys with zero extra code.
What's Tagged Automatically?
| UI Framework | Automatic Tagging | Configuration Required | Manual Tagging |
|---|---|---|---|
| UIKit ViewControllers | ✅ Tagged automatically by default | None - works out of the box | Optional - for custom names |
| SwiftUI Views | ✅ Tagged automatically with config | enableAutomaticScreenNameTagging = true (SDK v1.0.7+) | Optional - for edge cases |
Note
Highlights information that users should take into account, even when skimming.
Tip
Optional information to help a user be more successful.
Important
Crucial information necessary for users to succeed.
Warning
Critical content demanding immediate user attention due to potential risks.
Caution
Negative potential consequences of an action.
Success
Negative potential consequences of an action.
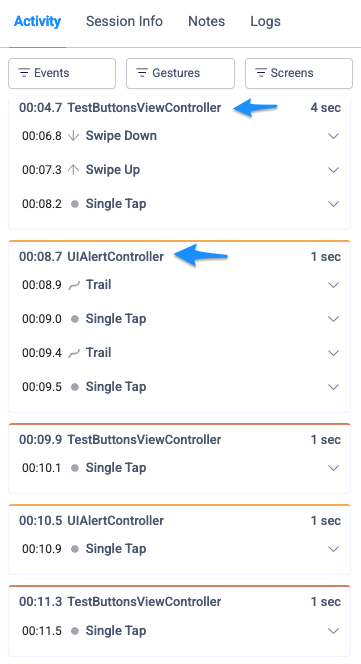
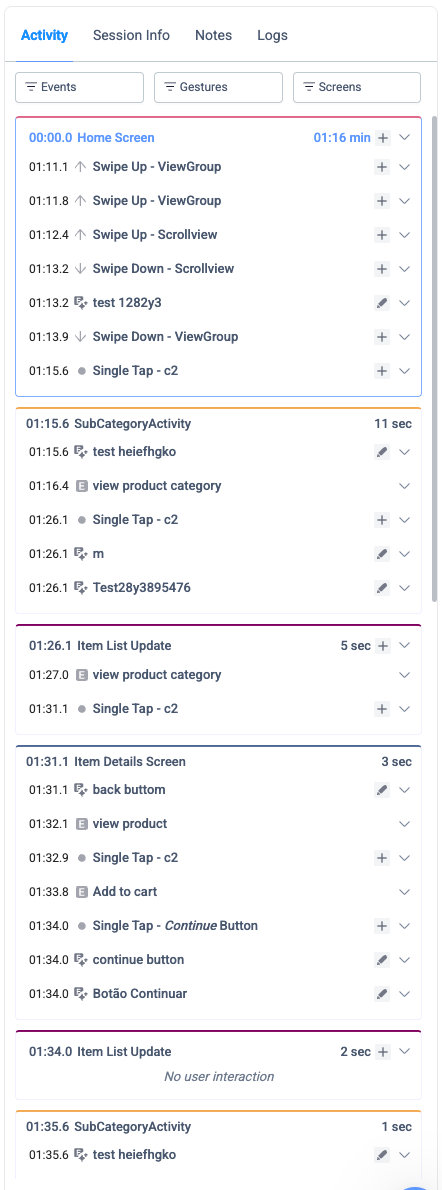
Review the default names
- Record one or more sessions in your Debug build while you navigate every main screen.
- Open any replay in the Dashboard → Session view and focus on the screen list at the right‑hand side.
- For each entry, ask:
| Check‑question | Why it matters |
|---|---|
| Does the name describe the UI the user actually saw? | Makes funnels human‑readable. |
| Would a heat‑map over the frames make sense? | Ensures events aggregate on the right surface. |
| Do any screens repeat with a 0 s duration? | Signals duplicate or missing tags. |
If everything looks good – simply rename screens in Dashboard → Screens (e.g. change
SettingsViewController→ Settings) and you’re done. No code required.
Names changed in the dashboard auto‑apply to future sessions as well.
Automatic Tagging will capture the ViewController's name by default
Enable or disable automatic tagging
Only turn it off if you see duplicate / meaningless names in your timeline and you are ready to maintain manual tags.
var config = UXCamConfiguration(appKey: "YOUR-APP-KEY")
config.enableAutomaticScreenNameTagging = false // TRUE by default
UXCam.start(with: config)
Manual Tagging — when you need it
Automatic and manual tagging can co‑exist. Leave auto‑tagging ON and call tagScreenName() only for the edge‑cases listed below.
| Symptom | Typical cause | Fix |
|---|---|---|
| Same visual screen logged under two names | UIViewController reused with different state | Call UXCam.tagScreenName("BetterName") in viewWillAppear when needed |
| SwiftUI NavigationStack only shows the root view | Single‑scene SwiftUI app | Tag inside .onAppear {} for each destination |
| Modal sheet shares the parent controller’s name | UIModalPresentation or SwiftUI .sheet | Tag inside viewDidAppear / .onAppear of the sheet |
| Same screen shows different tabs / segments | TabBar or segmented control not auto‑detected | Tag on tab‑switch callback |
| 0 s duplicates | Both auto‑tag and manual tag fire in the same frame | Remove extra tag or disable auto for that VC |
Tagging screens lets you separate your users interactions with meaningful structure.
Example A · Tagging a View Controller
Tag once per navigation event to avoid 0 s duplicates.
class CheckoutVC: UIViewController {
    override func viewWillAppear(_ animated: Bool) {
        super.viewWillAppear(animated)
        UXCam.tagScreenName("Checkout Screen")
    }
}
Example B · Tagging a SwiftUI View
struct OrderSummaryView: View {
    var body: some View {
        VStack {
            // …
        }
        .onAppear {
            UXCamCore.tagScreenName("Order Summary")
        }
    }
}
(Prefer .onAppear over onChange(of:navigationPath) so the tag matches the moment the view becomes visible.)
Tagging WebViews
WebViews contain dynamic content that rarely maps 1‑to‑1 to native screens. Use the JS ↔ native bridge to tag logical pages whenever the URL (or in‑page route) changes.
//  Inject into your WebView JS
window.webkit.messageHandlers.uxcam.postMessage({
  type: 'tagScreen',
  name: 'Pricing Page'
});// In your WKScriptMessageHandler delegate
if message.name == "uxcam", let dict = message.body as? [String: String],
dict["type"] == "tagScreen" {
UXCam.tagScreenName(dict["name"] ?? "WebView")
}For a full walk‑through—including regex URL matching—see [WebView Tagging →](/docs/ALL UXCAM APIs/tag-of-screens/web-view-tagging).
Verify your tags
- In Debug, navigate through every manually tagged screen; then background the app.
- Once the session uploads, confirm:
- Each screen appears exactly once with duration > 0 s.
- No “Unknown” or class‑name entries remain.
- Names match analytics terminology.
- Fix any issues by removing duplicate calls or adding a missing tag handler.
A solid screen‑naming strategy makes PII masking and heat‑map analysis far easier later on.
Troubleshooting cheat‑sheet
| Issue | Quick diagnosis | Solution |
|---|---|---|
| 0 s screens | Duplicate tag same frame | Disable auto or debounce manual call |
| Screen missing | Navigation path not handled | Add tag in .onAppear or viewWillAppear |
| Random class names | Forgot to rename in Dashboard | Edit in Screens tab |
| Stale name after refactor | Hard‑coded tag string | Update the constant in tagScreenName() |
| Deep‑link cold launch | First screen appears before SDK start | Initialise SDK in @main or application(_:didFinishLaunching) |
| Split‑view multitasking | Second window never gains focus | Tag in sceneDidBecomeActive for each connected scene |
| Internationalised tag strings | “Profile” vs “Perfil” split analytics | Tag with constant key, translate later in Dashboard |
6 · Edge‑cases to watch for
| Potential gap | What can break | How to guard |
|---|---|---|
| Orientation change recreates controller | Duplicate tag → 0 s screen | Debounce tags or handle viewWillTransition |
| Sheets / Alerts inside same controller | Heat‑map merges with parent screen | Tag inside viewDidAppear of the modal |
| Widget extension | Widget interactions never recorded | Call UXCamSwiftUI.start() in widget @main |
| SwiftUI preview builds | SDK runs in design canvas | Guard with XCODE_RUNNING_FOR_PREVIEWS env check |
| Dynamic Frameworks & SPM | Dead‑stripped calls in Release | Add -ObjC & “Force Load” flags or @_cdecl dummy |
Next Steps ➡️
You're on a roll! You've now set up some of the most important features from UXCam to get full insights already, but let's dive next into protecting sensitive information.
Updated 9 days ago
What's Next? ...
Tag screens automatically or manually to unlock heatmaps and journey analytics in iOS