Tagging Screens
Configure automatic and manual screen tagging to unlock heat‑maps, funnels and journey analytics.
Good screen names turn raw replays into actionable heat‑maps, screen analytics, conversion funnels and journey charts.
This guide walks you through reviewing the automatic tags first, deciding when (and how) to add manual tags, and finally verifying that every screen shows up with a meaningful duration.
Automatic Screen Tagging - The Recommended, Simple Approach
Note
Highlights information that users should take into account, even when skimming.
Tip
Optional information to help a user be more successful.
Important
Crucial information necessary for users to succeed.
Warning
Critical content demanding immediate user attention due to potential risks.
Caution
Negative potential consequences of an action.
Success
Negative potential consequences of an action.
For Android, UXCam's SDK automatically tags screens (i.e., activities), and this is the recommended default behaviour. Automatic tagging means that each activity your user navigates to is recorded automatically, without requiring you to manually intervene. This gives you the advantage of capturing user activity with minimal integration effort.
What's Tagged Automatically?
| UI Component | Automatic Tagging | Manual Tagging Required |
|---|---|---|
| Activities | ✅ Tagged automatically by default | Optional - for custom names |
| Fragments | ⚠️ Requires manual tagging (or dashboard configuration) | ✅ Recommended approach |
| Jetpack Compose | ❌ Not supported | ✅ Required |
Note
Highlights information that users should take into account, even when skimming.
Tip
Optional information to help a user be more successful.
Important
Crucial information necessary for users to succeed.
Warning
Critical content demanding immediate user attention due to potential risks.
Caution
Negative potential consequences of an action.
Success
Negative potential consequences of an action.
- Record one or multiple sessions in your debug build where you are navigating all screens of your app.
- Open any replay in the UXCam Dashboard and review the screen list on the right.
- For each entry, ask:
| Check‑question | Why it matters |
|---|---|
| Does the name describe the UI the user actually saw? | Makes funnels human‑readable. |
| Would a heat‑map over the frames make sense? | Ensures events aggregate on the right surface. |
| Do any screens repeat with a 0 s duration? | Signals duplicate or missing tags. |
If everything looks good – simply rename screens in Dashboard → Screens (e.g. change
MainActivity→ Home) and you’re done. No code required.
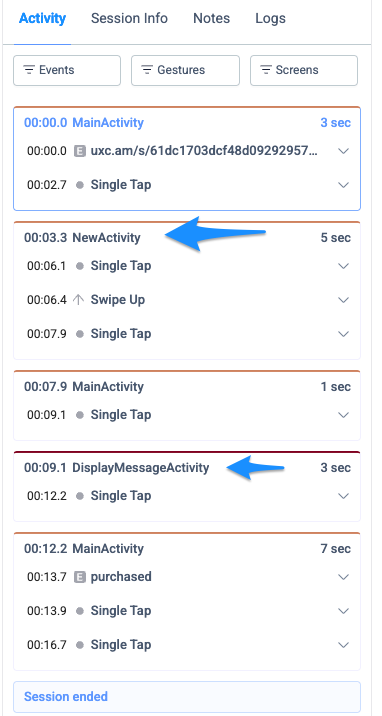
Automatic tagging will capture the activity names by default.
How to Enable or Disable Automatic Tagging?
Note
Highlights information that users should take into account, even when skimming.
Tip
Optional information to help a user be more successful.
Important
Crucial information necessary for users to succeed.
Warning
Critical content demanding immediate user attention due to potential risks.
Caution
Negative potential consequences of an action.
Success
Negative potential consequences of an action.
It will always be enabled by default, but you can disable this from your SDK configuration options as such:
val config = UXConfig.Builder(BuildConfig.YOUR_UXCAM_KEY)
    .enableAutomaticScreenNameTagging(false) // TRUE BY DEFAULT
    .build()
UXCam.startWithConfiguration(config)
UXConfig config = new UXConfig.Builder(BuildConfig.YOUR_UXCAM_KEY)
.enableAutomaticScreenNameTagging(false) // TRUE BY DEFAULT
.build();
UXCam.startWithConfiguration(config);Manual Tagging - When Do I Need It?
Note
Highlights information that users should take into account, even when skimming.
Tip
Optional information to help a user be more successful.
Important
Crucial information necessary for users to succeed.
Warning
Critical content demanding immediate user attention due to potential risks.
Caution
Negative potential consequences of an action.
Success
Negative potential consequences of an action.
| Symptom | Typical cause | Fix |
|---|---|---|
| Same visual screen logged under two names | Activity reused with different intent extras | Call UXCam.tagScreenName("BetterName") when you know the context |
| You're using Jetpack Compose | Traditional screen tagging requires extra setup | Please refer to this section to tag screens in Jetpack Compose |
Compose NavGraph only shows MainActivity | Single‑Activity architecture | Tag once per navigation change (see example) |
| Same screen shows different interfaces/places within your app | You're using Fragments within some activities and are not automatically tagged yet | Tag the fragment or enable fragment based tagging |
Tagging screens keeps your users interactions in their correct place in your app.
Example: Tagging an Activity Manually
Note
Highlights information that users should take into account, even when skimming.
Tip
Optional information to help a user be more successful.
Important
Crucial information necessary for users to succeed.
Warning
Critical content demanding immediate user attention due to potential risks.
Caution
Negative potential consequences of an action.
Success
Negative potential consequences of an action.
To tag a screen in an activity, use the following code in the onCreate() method of your activity:
@Override
protected void onCreate(Bundle savedInstanceState) {
    super.onCreate(savedInstanceState);
    setContentView(R.layout.activity_main);

    UXCam.tagScreenName("Main Page"); // Manually tag this activity with a screen name.
}
Example: Tagging a Fragment Manually
Similarly, to tag a fragment, place the code in the onResume() method of the fragment:
@Override
public void onResume() {
    super.onResume();
    UXCam.tagScreenName("Fragment Name"); // Manually tag this fragment with a screen name.
}
How to Tag WebViews
WebViews can be a unique challenge when it comes to screen tagging, as they often contain dynamic content. To properly tag your WebView screens, you can follow our detailed guide that walks you through the best practices and methods for effective WebView tagging.
For more information, see our comprehensive guide:
Verify Your Tags
So you've decided to manually tag some or all your screens, making sure this is properly set up is a fundamental part in ensuring heat-maps, funnels and user journey analytics is giving you full insights, so it is extremely important to verify everything works well before moving on:
-
In your debug environment, run the app and visit all the manually tagged screens, then background the app.
-
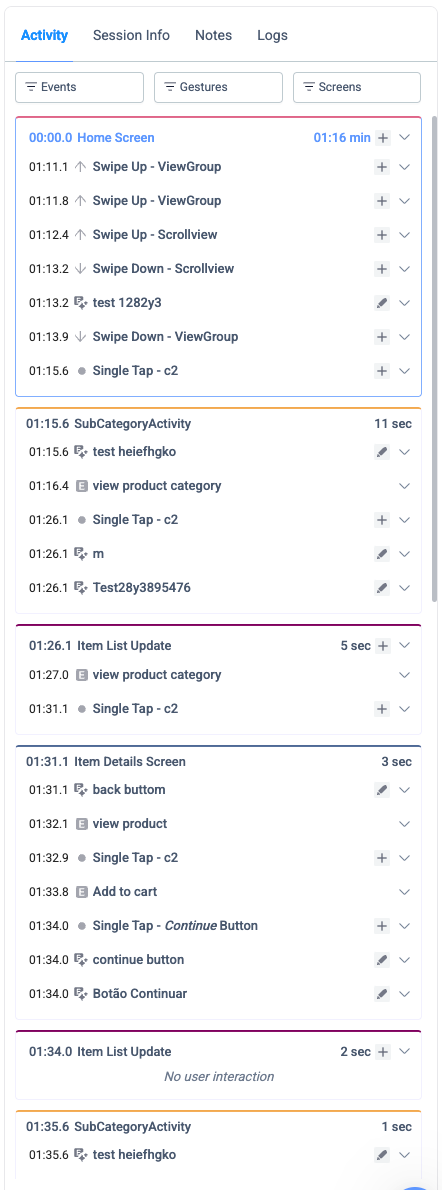
Once the session uploads, check:
- Each screen appears exactly once, according to the user's navigation, with duration > 0 s.
- No “Unknown” or class‑name (if fully manual) screens remain.
- Names match your analytics language.
If something is off, look for duplicate tag calls or a missing route handler.
Note
Highlights information that users should take into account, even when skimming.
Tip
Optional information to help a user be more successful.
Important
Crucial information necessary for users to succeed.
Warning
Critical content demanding immediate user attention due to potential risks.
Caution
Negative potential consequences of an action.
Success
Negative potential consequences of an action.
Troubleshooting cheat‑sheet
| Issue | Quick diagnosis | Solution |
|---|---|---|
| 0 s screens | Duplicate tag same frame (auto + manual) | Disable auto tagging or remove extra tag |
| Screen missing | NavController route not handled | Add case in when(route) |
| Random class names | Forgot to rename in Dashboard | Edit in Screens tab |
| Stale name after refactor | Hard‑coded tag string | Update UXCam.tagScreenName() constant |
Edge‑cases to watch for
| Potential gap | What can break | How to guard |
|---|---|---|
| Orientation change recreates activity | Duplicate tag → 0 s screen | Debounce tags or handle configChanges in manifest |
| Dialogs / BottomSheets within same activity | Heat‑map merges with parent screen | Tag inside show() – e.g. UploadDialog |
| Split‑screen mode on tablets | Sidebar never gains focus → no tag | Tag from onStart() in multi‑window mode |
| WebView checkout flow | Every step recorded as “WebViewScreen” | Trigger tags via JS bridge on URL change |
| Dynamic Feature Modules | ProGuard strips UXCam call sites | Keep com.uxcam package in base proguard-rules.pro |
| Deep‑link cold launch | First screen appears before SDK start | Initialise SDK in Application class |
| Internationalised tag strings | “Profile” vs “Perfil” split analytics | Tag with a constant key, translate in Dashboard |
| Rapid tab switching | Tags < 300 ms apart collapse to 0 s | Debounce tag logic in nav listener |
Next Steps:
You've properly tagged screens and are ready to move on! Let's review some next steps you should take.
If applicable, make sure screen tagging is properly done in your Compose App.
Protect Your Users' Privacy and PII Data
Mask or Blur Screens, Views and Fields
Get The Full Picture with User Analytics
Assign Custom User IDs and Properties
Deeper Insights of Your Users' interactions
Send Events and Add Properties
Updated 9 days ago