iOS SDK Integration Guide
How to Get Started with UXCam for iOS
Note
Highlights information that users should take into account, even when skimming.
Tip
Optional information to help a user be more successful.
Important
Crucial information necessary for users to succeed.
Warning
Critical content demanding immediate user attention due to potential risks.
Caution
Negative potential consequences of an action.
Success
Negative potential consequences of an action.
Integration Journey at a Glance
- Customize SDK Configuration — Capture your first live session.
- Tag Screens — Enable heat-maps & screen analytics.
- Mask Sensitive Data — Hide passwords and other GDPR/CCPA data.
- Identify Users & Set Properties — Unify sessions, power funnels & cohorts.
- Track Custom Events — Measure key actions & run final QA.
Note
Highlights information that users should take into account, even when skimming.
Tip
Optional information to help a user be more successful.
Important
Crucial information necessary for users to succeed.
Warning
Critical content demanding immediate user attention due to potential risks.
Caution
Negative potential consequences of an action.
Success
Negative potential consequences of an action.
Key Benefits After Setup
- Session Replay + Heatmaps – Watch every user experience moment in full context.
- Advanced Product Analytics – funnels, retention, feature adoption.
- Insight Alerts – journey summaries, rage-tap & anomaly detection.
- Engineering Analytics – Connect client-side performance to real sessions. Monitor crashes, ANRs, and handled exceptions with session replay and developer logs for faster debugging.
Tips Before You Begin
- Create separate keys for debug & production to keep data clean.
- Use feature flags to toggle UXCam in staging builds.
- Check Logcat for “Verification successful” and “Session/Video uploaded” messages to confirm the integration is working correctly.
Note
Highlights information that users should take into account, even when skimming.
Tip
Optional information to help a user be more successful.
Important
Crucial information necessary for users to succeed.
Warning
Critical content demanding immediate user attention due to potential risks.
Caution
Negative potential consequences of an action.
Success
Negative potential consequences of an action.
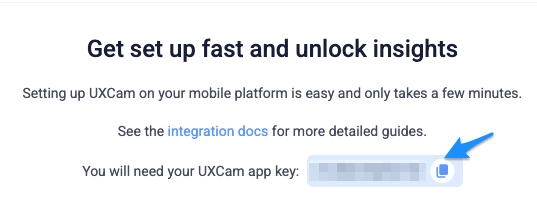
Step 1: Get your App Key
1.1: Find your app key
If you don't already have it, find it in App Settings -> App Key on your UXCam Dashboard.
Note
Highlights information that users should take into account, even when skimming.
Tip
Optional information to help a user be more successful.
Important
Crucial information necessary for users to succeed.
Warning
Critical content demanding immediate user attention due to potential risks.
Caution
Negative potential consequences of an action.
Success
Negative potential consequences of an action.
1.2: Keep it out of source control:
Put the key in an ignored .xcconfig file or pass it in as an environment variable from your CI, then reference it via a build-setting placeholder (e.g. $(UXCAM_APP_KEY)) so the value is injected at compile-time and never hard-coded in source.
Quick Start: Only a Couple of Lines of Code
Let's get you started with the basics. With just a few lines of code, you'll be on your way to capturing user sessions in your test app.
Adding the Dependencies
Cocoapods
- Add UXCam to your
Podfile:
pod 'UXCam'
- Run
pod installin the project directory to download dependency.
Swift Package Manager
- If you prefer Swift Package Manager, you can add UXCam using the following URL:
https://github.com/uxcam/uxcam-ios-sdk
Specify the exact version to ensure compatibility.
Initializing UXCam
- Imports:
import UXCam- Configuration
Add the following initialisation to application:didFinishLaunchingWithOptions: in your AppDelegate:
let configuration = UXCamConfiguration(appKey: "YOUR_APP_KEY")Replace "YourAppKey" with the app key available on your UXCam dashboard.
- Then, start the SDK with your configuration object
import UXCam

func application(_ application: UIApplication,
                 didFinishLaunchingWithOptions launchOptions: [UIApplication.LaunchOptionsKey: Any]?) -> Bool {
    let config = UXCamConfiguration(appKey: "YOUR_APP_KEY")

    UXCam.optIntoVideoRecordings()

    #if DEBUG
    // 🔍 Enable verbose integration logs in Debug builds only
    config.enableIntegrationLogging = true
    #endif

    UXCam.start(with: config)
    return true
}
Available Configuration Options:
enableAutomaticScreenNameTagging
Used to disable automatic screen tagging if manual tagging of the screens will be done, default is true
enableAdvancedGestureRecognition
Control the gesture recognizers used by UXCam. Set TRUE to enable the full range of gesture recognizers (the default) or FALSE to limit it to basic gestures.
enableCrashHandling
Crash handling is enabled by default, to let you capture all the sessions with crashes and see the corresponding crash logs.
enableMultiSessionRecord
Enable or disable recording of multiple sessions per app launch. Default is true.
enableIntegrationLogging
Enable verbose SDK logs in the console for debugging. Default is false. Enable only in DEBUG builds.
enableNetworkLogging
Capture per-request network data (URL, method, status code, timing) for timeline correlation. Available since v3.7.9. Default is false.
occlusion
Set a
UXCamOcclusion object to pre-configure sensitive data masking at SDK start. See Sensitive Data Occlusion.
environment
Set the app environment:
.alpha, .beta, or .release. Useful for filtering sessions by build type on the dashboard.
Build & Test
Run the app on a simulator or device, navigate a few screens, then send it to the background. Your first session replay will appear on the UXCam dashboard within seconds.
Note
Highlights information that users should take into account, even when skimming.
Tip
Optional information to help a user be more successful.
Important
Crucial information necessary for users to succeed.
Warning
Critical content demanding immediate user attention due to potential risks.
Caution
Negative potential consequences of an action.
Success
Negative potential consequences of an action.
We recommend that after you've set this up and have reviewed some sessions from your tests, get to the customisation features UXCam offers, let's go to the next steps!
Video Tutorial:
Next Steps ➡️
You’ve successfully integrated UXCam and sent some sessions, great job! 🎉 But there's so much more you can do. Now, let’s go further into setting things up.
Take full advantage of heatmaps and screen analytics.
Review Automatic or Manual Tagging
Protect your users’ privacy by masking sensitive data.
Mask or Blur Screens, Views and Fields
Get the full picture with user-level analytics.
Assign Custom User IDs and Properties
Gain deeper insights into your users' interactions.
Send Events and Add Properties
Updated 9 days ago