Sensitive Data Occlusion In Cordova Apps
Hide sensitive data and PII from session recordings in your Cordova app
In this section, we focus on how to handle sensitive data within your Cordova application using UXCam's features to ensure privacy compliance. It is essential to occlude sensitive information to protect user data like passwords, credit card numbers, or any other Personally Identifiable Information (PII).
UXCam ensures that as a controller you can use our platform and fulfil your obligations under GDPR. However, if you collect any PII data in your app such as email address, phone, or credit card number you should use our API to hide it.
You can choose to hide:
- Text Fields: Hide PII collected through text input fields
- Views: Hide specific views on the screen.
- Screens: Hide entire screens, such as payment pages
Sensitive information is hidden directly on the device by applying red boxes or blurring, meaning this data is never sent to UXCam servers. Ensure that all sensitive data is hidden before releasing your app to production.
Note: When occluding sensitive data, you still have the option to record gestures for those views or screens. If you're occluding passwords or other sensitive inputs, we recommend also disabling gesture recording.
Are there any elements occluded right out of the box?
Cordova provides the following occlusion behaviour by default:
- Any text input tagged with
uxcam-occludeor<>is occluded.
Add Occlusions Directly From Your Dashboard:
You can now add occlusion rules to your app directly from your dashboard. Simply go into your app's settings in your dashboard and enable the rules you need, below is a breakdown of how to take full advantage of this feature, without having to resort to adding additional code in your app for most scenarios:
Occlude All Screens from Dashboard
From your app's settings in the UXCam dashboard, you'll see the video recording privacy section, from there, you'll see the first option to either record, occlude or blur all screens in your app.
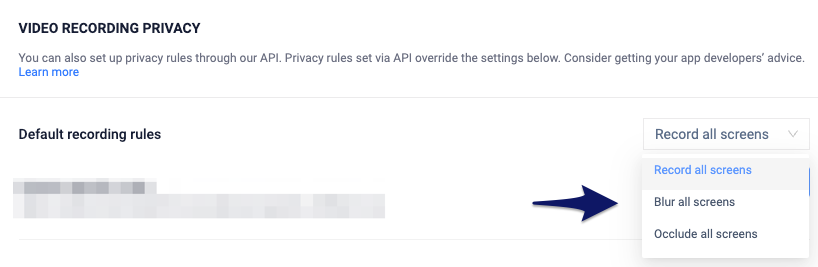
Blur option will also enable you to select the blur radius (strength) once selected.
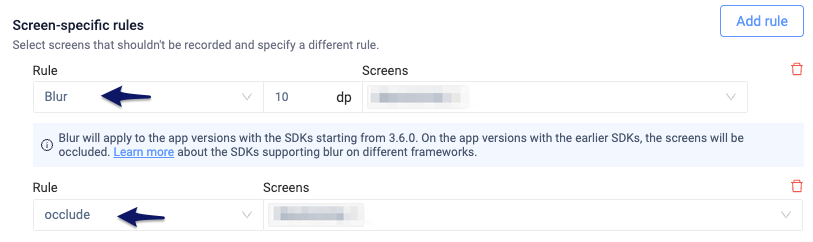
Screen Specific Occlusion Rules from Dashboard
You can also customise which screens you want to apply occlusion rules to, and can create multiple rules, for example, blurring a particular screen but occluding others:
Occlude Text Input Fields from Dashboard
You can also choose to occlude all text input fields on a specific or multiple screens by simply checking the option and selecting the screens you'd like to occlude the text inputs in.

NoteNote
Additionally, you can opt to record gestures on all blurred/occluded screens by toggling on the option

Occlusion priority:
- Screen specific overlay from Dashboard
- Screen specific blur from Dashboard
- Global blur/overlay from Dashboard that is applied to all screens
- Screen specific Overlay from SDK
- Screen specific Blur from SDK
- Global blur/overlay from SDK that is applied to all screens
- Global blur/overlay from SDK that has Record exception screens
Limitations:
- Hiding sensitive Views needs to be handled from code (see here)
Occlusion Setup from SDK Code
If you prefer to manually handle occlusions in your app or occlude specific views instead of entire screens, read below for guidance on how to set it up.
Occlude The Entire Screen with Overlay
You can configure different overlay options with the following:
// Apply an overlay to the entire screen
UXCam.applyOcclusion();

// Remove the overlay
UXCam.removeOcclusion();
Available overlay options are:
withoutGesture(boolean withoutGesture) || hideGestures(boolean hideGestures)
Allows the user to configure wether to capture gesture in the occluded screen or not. Passing in false to this method tells the SDK to capture gestures. Default is true, so by default the gestures are not captured.
screens(List screens) - Use it in the configuration object
Allows you to define the screens where the overlay is to either be applied or not, depending on the value passed to excludeMentionedScreens(boolean excludeMentionedScreens).
By default, if no screens are passed, the overlay is applied to all the screens unless explicitly removed. This acts as a global setting and will override all other occlusion settings defined for all screens. The occlusion must be removed to revert this action.
If screens are passed, you have the ability to either apply overlay on the mentioned screens or to exclude the mentioned screens from being overlayed.
excludeMentionedScreens(boolean excludeMentionedScreens)
This option should be used in conjunction with screens(List screens).
If the passed in value is true, it tells the SDK to exclude the mentioned screens from occlusion, while applying the occlusion to the rest of the screens in the app.
If the passed in value is false, it tells the SDK to apply occlusion only to the screens that have been passed.
Default value is false.

You'll see the desired screen completely hidden while your users navigate through it.
Blur The Entire Screen
Blur is an occlusion API that allows you to blur screen records of screens. This lets you obtain information regarding the state of the screen and user interaction, while also maintaining privacy in sensitive screens.
This is useful to set all the occlusion/Blur from one place of the application without having to set it individually in different screens.
You can configure different options using the following:
// Apply a blur to a screen
UXCam.applyBlur();

// Remove the blur
UXCam.removeBlur();
Available blur options are:
blurRadius(int blurRadius)
This option allows you to define the blur radius to be used for blurring. The higher the value, the more blurred the resulting video is going to be.
withoutGesture(boolean withoutGesture) || hideGestures(boolean hideGestures)
Same as overlay. Please refer to overlay section.
screens(List screens) - Use it in the configuration object
Same as overlay. Please refer to overlay section.
excludeMentionedScreens(boolean excludeMentionedScreens)
Same as overlay. Please refer to overlay section.
 (1).gif")
You'll see your desired screens with a blur on top.
Examples on blur radius property customization:
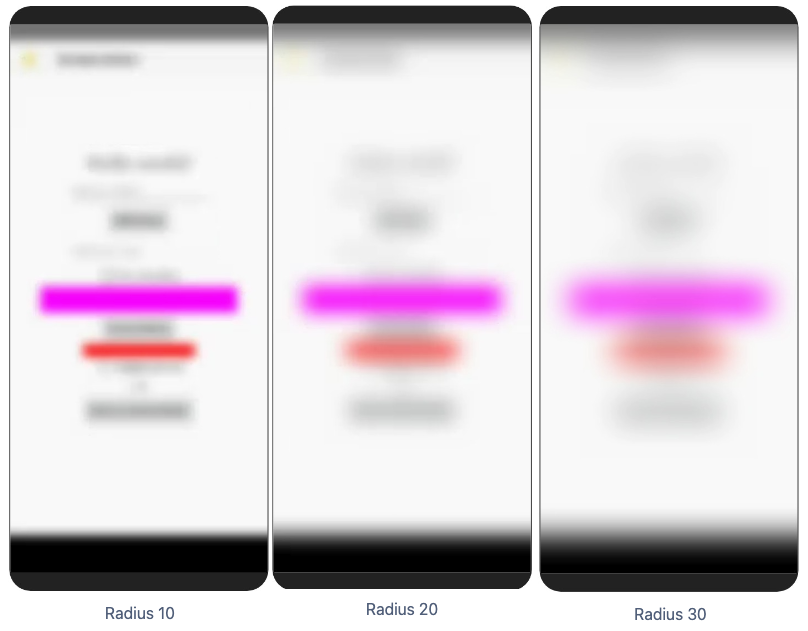
Blur radius customization examples
Occlude all Text Fields
Similar to the new Overlay and Blur APIs:
// Apply an occlusion to all text fields
UXCam.occludeAllTextFields();

// Stop occluding text fields
UXCam.stopOccludingAllTextFields();
NOTE: Please keep in mind that this API will only hide
TextFields
components. If you wish to hideViewcomponents, refer to hiding Views below.

All fields identified as text will be occluded.
Hide Sensitive View
Use it to hide specific views with sensitive information that you don't want to record.
You can occlude sensitive elements in your app by adding uxcam-occlude as your element class name
<label for="email">Email:</label>
<input type="email" id="email" class="uxcam-occlude" name="email">
Usage from configuration object
It's also possible to pass a list of occlusions (except Sensitive View) to be applied during configuration. For example:
const blur = {
  type: 3,
  blurRadius: 20, // optional default 10
  hideGestures: true, // optional, default true
  screens: ["screen1", "screen2"] // optional, default all screens
}

const configuration = {
  userAppKey: 'YOUR API KEY',
  enableMultiSessionRecord: true,
  enableCrashHandling: true,
  enableAutomaticScreenNameTagging: false,
  enableImprovedScreenCapture: true,
  occlusions: [blur]
}
UXCam.startWithConfiguration(configuration);
Sensitive Data Occlusion Inside WebViews
When dealing with sensitive data in WebViews, it's essential to ensure that any personal or sensitive information is properly occluded to maintain user privacy. Our guide provides step-by-step instructions on how to handle occlusion within WebViews effectively.
For more information, click the button below:
Updated 21 days ago
What's Next? ...
Hide sensitive data and PII from session recordings in your Cordova app